按照惯例先吟诗一首:
《竹里馆》–王维
独坐幽篁里,弹琴复长啸。
深林人不知,明月来相照。
从搭建到成功以及本文的诞生,前后花了两天时间,真是一把辛酸泪,感觉还是挺费事的,中途一度想放弃,可还是咬牙坚持下来了,但看到结果后感觉一切的辛苦都是值得的。过程中一定要有耐心,毕竟需要用到的东西挺多的,比如:node.js、git、 github、hexo其中的知识。废话不多说了,详情如下:
一、系统环境配置:
要想利用Hexo、GitHub搭建个人博客,首先要安装Node.js、git:
1、Node.js安装:
或者通过如下命令安装:
brew install node #最新版的node.js的包中已经集成了npm包管理工具
通过如下命令查看是否安装成功:
node -v
npm -v
2、Git安装及配置:
或者通过如下命令安装:
brew install git #Mac电脑使用brew安装
sudo apt-get install git #Ubuntu系统使用这条命令安装
配置详见另外一篇博客: git安装与配置
3、Hexo安装:
$ npm install hexo -g #-g表示全局安装, npm默认为当前项目安装
如遇错误,请使用一下安装:
$ npm install hexo –no-optional
验证是否成功安装:
$ hexo -v
目前我用到的环境如下 ,出现类似如下环境说明hexo安装成功
hexo-cli: 1.0.2
os: Darwin 16.4.0 darwin x64
http_parser: 2.7.0
node: 6.10.0
v8: 5.1.281.93
uv: 1.9.1
zlib: 1.2.8
ares: 1.10.1-DEV
icu: 58.2
modules: 48
openssl: 1.0.2k
创建博客的根目录并切换到更目录下:
$ mkdir myblog
$ cd myblog
初始化myblog文件夹使其成为Hexo博客:
$ hexo init
自动根据当前目录下文件,生成静态网页:
$ hexo generate
运行本地服务:
$ hexo server
有必要提下Hexo常用的几个命令:
$ hexo new “postName” #新建文章
$ hexo new page “pageName” #新建页面
$ hexo generate (或者hexo g) 生成静态文件,会在当前目录下生成一个新的叫做public的文件夹
$ hexo server (或者hexo s) 启动本地web服务,用于博客的预览
$ hexo deploy (或者hexo d) 部署播客到远端(比如github, coding等平台)
常用简写:
$ hexo n == hexo new
$ hexo g == hexo generate
$ hexo s == hexo server
$ hexo d == hexo deploy
常用组合:
$ hexo d -g #生成部署
$ hexo s -g #生成预览
通过hexo g生成静态文件和hexo s启动本地web服务后,现在我们打开http://localhost:4000/ 就可以看到一篇内置的blog了。看到后是不是感觉很有成就感?反正我是这么认为的。
二、Hexo主题设置
默认的主题是landscape,这里以主题yilia为例进行说明。Hexo中文官网:下载主题、配置详解
安装主题
$ hexo clean
$ git clone https://github.com/litten/hexo-theme-yilia.git themes/yilia
修改主题
修改myblog目录下的_config.yml配置文件中的theme属性,将其设置为yilia。
并按照主题说明进行相关的配置,这点很重要,否则修改后的主题样式会有变化
例如:git clone https://github.com/GeekaholicLin/hexo-theme-ylion.git这个主题
就需要在_config.yml配置文件添加如下内容:search插件基于 https://github.com/PaicHyperionDev/hexo->generator-search
使用说明请参考该repo
search:
path: search.xml
field: all
更新主题
$ hexo g # 生成
$ hexo s # 启动本地web服务器
三、GitHub Pages配置
1、注册、登录GitHub
github官网:https://github.com/
2、创建项目仓库
注册并登陆Github官网成功后,点击页面右上角的+,选择New repository。
3、填写项目名
在Repository name中填写:Github账号名.github.io 必须这样填,否则会出错 例如我的账号为:allen,那么就必须填allen.github.io
4、设置GitHub pages
打开settings,有一个Github Pages 的设置,点击 source 中的本来的 None ,使其变成 master 分支,也就是作为部署github pages 的分支,然后点击 save。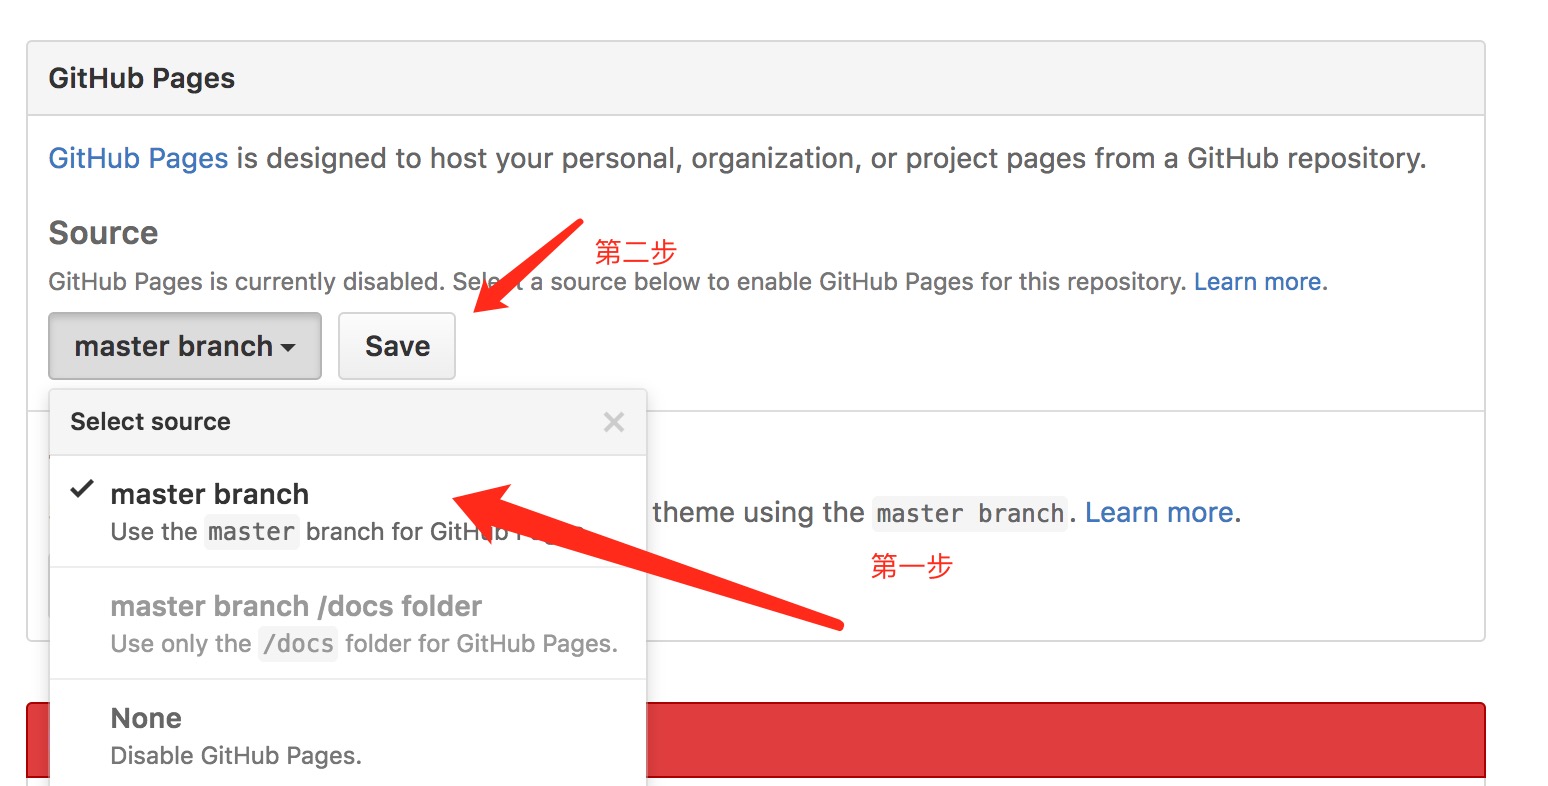
5、查看网址
页面刷新之后,再看 github pages 设置框处,多了一行网址,就是你的 github pages 的网址了,点击进去就进入属于你自己的博客网址了。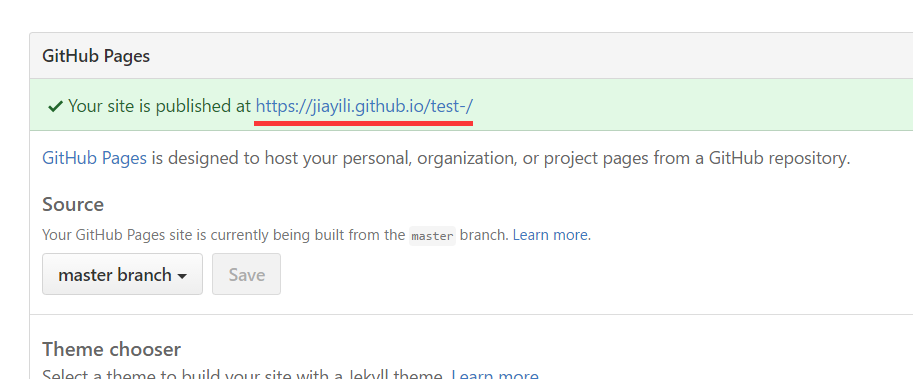
四、部署到GitHub pages
1、修改_config.yml
千万要注意冒号:后边要留有空格
基本设置
title: allen
subtitle: welcome to allen blog
description:
author: John Doe
language: zh-CN #语言
timezone: #时区URL
If your site is put in a subdirectory, set url as ‘http://yoursite.com/child‘ and root as ‘/child/‘url: http://suxianglun.github.io #用于绑定域名, 其他的不需要配置,即为GitHub pages生成的那个网址
root: /
permalink: :year/:month/:day/:title/
permalink_defaults:Extensions
Plugins: https://hexo.io/plugins/
Themes: https://hexo.io/themes/
theme: hexo-theme-landfarz #主题设置Deployment
Docs: https://hexo.io/docs/deployment.html
deploy: #部署, 发布在 GitHub 上面
type: git
repo: git@github.com:suxianglun/suxianglun.github.io.git #GitHub 项目仓库
branch: master
2、部署到GitHub 上
$ hexo clean #清除
$ hexo g #生成
$ hexo d #部署 # 可与hexo g合并为 hexo d -g$ hexo d 之后如果出现ERROR Deployer not found: Git,请键入如下命令
$ npm install hexo-deployer-git –save
部署之后去查看GitHub pages那个网址http://suxianglun.github.io,有可能会出现:
Your site is having problems building: unable to build page. Please try again later. 或者
Your page is having problems building: page build failed
同时也会收到github发来的page build failure的邮件,但是邮件中显示的错误信息和settings页面上的一样, 就这句话, 什么都没有, 没有任何错误提示.我就卡在这一天,后来用了好长时间来解决了。我分析的主要原因如下:
1、Hexo未进行构建html,即未执行hexo g,这个过程需要一段时间,构建好html后myblog根目录下完整目录应该如下:
README.md db.json package.json scaffolds
themes
_config.yml node_modules public source
2、Hexo 配置不正确,请严格按照要求进行配置
注意事项:
markdown标题标准写法写法需要在”#”和后面字符之间加一个空格
如果不加空格 有些引擎就解析不了
另外说一下我的个人博客地址 https://suxianglun.github.io/ 欢迎来骚扰。


